Data Engineering
Running Airflow on Google Kubernetes Engine without Helm

Introduction
Google Cloud Platform (GCP) can be a very good option for Airflow and, although it offers its own managed deployment of Airflow, Cloud Composer, managing our own deployment gives us more granular control over the underlying infrastructure, impacting choices such as what Python version to run and even when to upgrade Airflow itself.
The Airflow community maintains a Helm chart for Airflow deployment on a Kubernetes cluster. The Helm chart comes with a lot of resources, as it contains a full Airflow deployment with all the capabilities. We didn’t need all of that, and we wanted granular control over the infrastructure. Therefore, we chose not to use Helm, although it provides a very good starting point for the configuration.
Overview
The Airflow installation consists of five different components that interact with each other, as illustrated below:
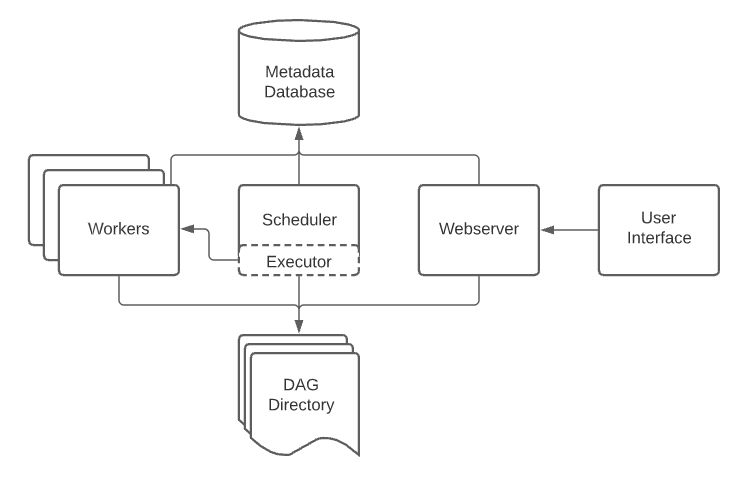 (Source: Official Airflow Documentation )
In order to configure our Airflow deployment on GCP, we used a few different services:
- Google Kubernetes Engine (GKE) for the cluster hosting the scheduler and webserver deployments
- Postgres instance in CloudSQL for the metadata database
- Git-sync to store DAG files in an ephemeral volume, syncing directly from GitHub
NOTE: The steps below assume you have both the Google Cloud SDK and kubectl installed, and a GCP project set up.
CloudSQL and Cluster Set Up
Before deploying Airflow, we need to configure a CloudSQL instance for the metadata database and the GKE cluster that will host the Airflow deployment. We opted to use a Virtual Private Cloud (VPC) to allow the connection between GKE and CloudSQL.
Setting up a CloudSQL instance
To create a CloudSQL instance for the Airflow database:
gcloud sql instances create airflow_metadb \
    --database-version=POSTGRES_15 \
    --tier=db-n1-standard-2 \
    --region=us-east1 \
    --network=airflow_network
    --root-password=admin
Customize the database version, tier, region, and network to your needs. If you don’t plan on using a VPC, you don’t need the network argument. Check out the gcloud sql instances create documentation for a full list of what’s available.
Connect to the newly created instance to create a database to serve as the Airflow metadata database. Here, we’ll create a
database called airflow_metadb:
gcloud beta sql connect airflow_metadb
This will open a Postgres shell, where you can create the database.
CREATE DATABASE airflow_meta;
Finally, get the instance’s IP address and port to construct the database connection URL, which will be needed for the Airflow
set up. You’ll need the IP address listed as PRIVATE:
gcloud sql instances describe airflow_metadb
Your connection URL should follow the format:
postgresql+psycopg2://username:password@instance-ip-address:port/db-name
for a Postgres instance.
Setting up a GKE Cluster
Before initializing a new Kubernetes cluster on GKE, make sure you have the right project set in the gcloud CLI:
gcloud config set project airflow
Create a new cluster on GKE:
gcloud container clusters create airflow-cluster \
    --machine-type e2-standard-2 \
    --num-nodes 1 \
    --region "us-east1" \
    --scopes "cloud-platform"
Choose the correct machine type for your needs. If your cluster ends up requesting more resources than you need, you’ll end
up overpaying for Airflow. Conversely, if you have less resources than required, you will run into issues such as memory pressure.
Also choose the number of nodes to start and the region according to your needs. The --scopes argument set to cloud-platform
allows the GKE cluster to communicate with other GCP resources. If that is not needed or desired, remove it.
For a full list of the options available, check the gcloud container clusters create documentation .
Authenticate kubectl against your newly created cluster:
gcloud container clusters get-credentials airflow-cluster --region "us-east1"
and create a Kubernetes namespace for the Airflow deployment. Although not necessary, this is a good practice, and it’ll allow for the grouping and isolating of resources, enabling, for example, separation of a production and staging deployment within the same cluster.
kubectl create namespace airflow
The cluster should now be set up and ready.
Cluster Preparation
Our goal was to have Airflow deployed to a GKE cluster and the Airflow UI exposed via a friendly subdomain. In order to do that, we need to obtain and use a certificate.
To make the process of obtaining, renewing, and using certificates as easy as possible, we decided to use cert-manager, a
native Kubernetes certificate management controller . For that to work, though, we
need to ensure that traffic is routed to the correct service, so requests made to the cert-manager solver to confirm domain
ownership reach the right service, and requests made to access the Airflow UI also reach the right service.
In order to do that, an nginx ingress controller was needed.
NGINX Ingress Controller Configuration
Unlike an Ingress, an Ingress Controller is an application running inside the cluster that configures a load balancer according
to multiple ingress resources. The NGINX ingress controller is deployed in a pod along with such load balancer.
To help keep the ingress controller resources separate from the rest, let’s create a namespace for it:
kubectl create namespace ingress-nginx
The easiest way to deploy the ingress controller to the cluster is through the official Helm Chart .
Make sure you have helm installed, then add the nginx Helm repository and update your local Helm chart repository cache:
helm repo add ingress-nginx https://kubernetes.github.io/ingress-nginx
helm repo update
Install the ingress-nginx Helm chart in the cluster:
helm install nginx-ingress ingress-nginx/ingress-nginx -n ingress-nginx
where nginx-ingress is the name we’re assigning to the instance of the Helm chart we’re deploying, ingress-nginx/ingress-nginx
is the chart to be installed (the ingress-nginx chart in the ingress-nginx Helm repository) and -n ingress-nginx specifies
the namespace within the Kubernetes cluster in which to install the chart.
With the controller installed, run:
kubectl get services -n ingress-nginx
and look for the EXTERNAL IP of the ingress-nginx-controller service. That is the IP address of the load balancer.
To expose the Airflow UI via a subdomain, we configured an A record pointing to this IP address.
Cert-manager Configuration
Now that the controller is in place, we can proceed with the installation of the cert-manager. First, apply the CRD
(CustomResourceDefinition) resources:
kubectl apply -f https://github.com/jetstack/cert-manager/releases/download/v1.13.0/cert-manager.crds.yaml
The cert-manager relies on its own custom resource types to work, this ensures these resources are installed.
Like with the controller, we’ll also create a separate namespace for the cert-manager resources:
kubectl create namespace cert-manager
And install cert-manager using the Helm chart maintained by Jetstack :
helm repo add jetstack https://charts.jetstack.io
helm repo update
helm install cert-manager jetstack/cert-manager --namespace cert-manager --version v.1.13.0
With cert-manager installed, we now need two additional resources to configure it: a ClusterIssuer and Certificate.
The ClusterIssuer creates a resource to represent a certificate issuer within Kubernetes, i.e., it defines a Kubernetes
resource to tell cert-manager who the certificate issuing entity is and how to connect to it. You can create
a simple ClusterIssuer for Let’s Encrypt as follows:
apiVersion: cert-manager.io/v1
kind: ClusterIssuer
metadata:
  name: letsencrypt
spec:
  acme:
    server: https://acme-v02.api.letsencrypt.org/directory
    email: my_email@my_domain.com
    privateKeySecretRef:
      name: letsencrypt
    solvers:
    - http01:
        ingress:
          class: nginx
The Certificate resource then defines the certificate to issue:
apiVersion: cert-manager.io/v1
kind: Certificate
metadata:
  name: airflow-certificate
  namespace: airflow
spec:
  secretName: cert-tls-secret
  issuerRef:
    name: letsencrypt
    kind: ClusterIssuer
  commonName: airflow.my_domain.com
  dnsNames:
  - airflow.my_domain.com
Apply both resources to the cluster to get the certificate issued. Assuming everything went well and the DNS records are set up correctly, when you run:
kubectl describe certificate airflow-certificate -n airflow
you should see Status: True at the bottom of the certificate’s description, indicating the certificate has been issued.
Now our cluster is ready to receive the Airflow deployment.
Deploying Airflow
The Airflow deployment includes a few different pieces, so we can get Airflow to properly work. The Airflow installation in Kubernetes ends up looking more like this:
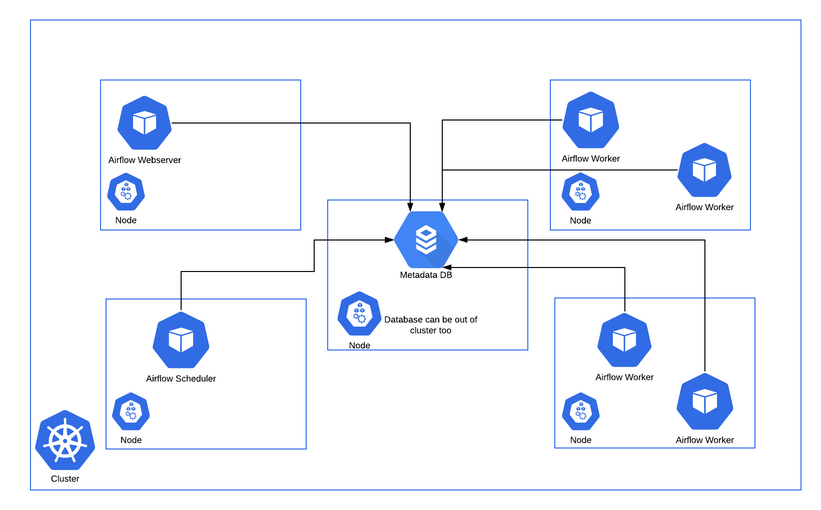 (Source: Official Airflow Documentation )
Our complete Airflow deployment resources ended up looking like this:
resources
|---- airflow.cfg
|---- secrets.yaml
|---- persistent_volumes
      |---- airflow-logs-pvc.yaml
|---- rbac
      |---- cluster-role.yaml
      |---- cluster-rolebinding.yaml
|---- scheduler
      |---- scheduler-deployment.yaml
      |---- scheduler-serviceaccount.yaml
|---- statsd
      |---- statsd-deployment.yaml
      |---- statsd-service.yaml
|---- webserver
      |---- webserver-deployment.yaml
      |---- webserver-ingress.yaml
      |---- webserver-service.yaml
      |---- webserver-serviceaccount.yaml
Secrets and Configuration
In order to successfully deploy Airflow, we need to make sure the airflow.cfg file is available in the relevant pods.
Airflow allows you to configure a variety of different things through this file (check the Configuration Reference
for more detailed information).
In Kubernetes, this kind of configuration is stored in a ConfigMap, which a special kind of “volume” you can mount inside
your pods and use to make configuration files available to them. The ConfigMap works together with Kubernetes secrets,
meaning you can reference a Secret directly inside a ConfigMap or pass the Secret as an environment variable and
reference that.
Of note: Kubernetes secrets are somewhat unsafe considering they just contain a base64 encrypted string that can
be easily decrypted. If secrets need to be versioned or committed somewhere, it’s better to use GCP’s Secret Manager
instead.
A ConfigMap for the airflow.cfg file can be created running:
kubectl create configmap airflow-config --from-file=airflow.cfg -n airflow
where airflow-config is the name of the ConfigMap created and the -n airflow flag is necessary to create the resource
in the correct namespace.
Kubernetes secrets can be created using a secrets.yaml manifest file to declare individual secrets:
apiVersion: v1
kind: Secret
metadata:
  name: airflow-metadata
type: Opaque
data:
  connection: "your-base64-encrypted-connection-string"
  fernet-key: "your-base64-encrypted-fernet-key"

---

apiVersion: v1
kind: Secret
metadata:
  name: git-sync-secrets
type: Opaque
data:
  username: "your-base64-encrypted-username"
  token: "your-base64-encrypted-token"
If you decide to go with plain Kubernetes secrets, keep this yaml file private (don’t commit it to a repository). To
apply it to your cluster and create all the defined secrets, run:
kubectl apply -f secrets.yaml -n airflow
This command will apply the secrets.yaml file to the Kubernetes cluster, in the airflow namespace. If secrets.yaml
is a valid Kubernetes manifest file and the secrets are properly defined, all Kubernetes secrets specific within the file
will be created in the cluster and namespace.
Persistent Volumes
What volumes (and how many volumes) you’ll need will depend on how you decide to store Airflow logs and how your DAGs are structured. There are, in essence, two ways to store DAG information:
- Store DAGs in a persistent volume
- Sync them from a git repository into an ephemeral volume mounted inside the cluster
The key point to keep in mind is that the folder the Airflow scheduler and webserver are watching to retrieve DAGs from and
fill in the DagBag needs to contain built DAGs Airflow can process. In our case, our DAGs are static, built directly into
DAG files. Therefore, we went with a simple git-sync approach, syncing our DAG files into an ephemeral volume and pointing
the webserver and scheduler there.
This means the only persistent volume we needed was to store Airflow logs.
A PersistentVolume is a cluster resource that exists independently of a Pod, meaning the disk and data stored there will
persist as the cluster changes, and Pods are deleted and created. These can be dynamically created through a PersistentVolumeClaim,
which is a request for and claim to a PersistentVolume resource:
apiVersion: v1
kind: PersistentVolumeClaim
metadata:
  name: airflow-logs-pvc
spec:
  accessModes:
    - ReadWriteOnce
  resources:
    requests:
      storage: 10Gi
  storageClassName: standard
This creates an airflow-logs-pvc resource we can use to store Airflow logs.
Role-Based Access Control (RBAC)
Kubernetes RBAC is a security feature allowing us to manage access to resources within the cluster through defined roles.
A Role is a set of rules that defines the actions allowed within a specific namespace. A RoleBinding is a way to associate
a specific Role with a user or, in our case, a service account.
To define roles that apply cluster-wide rather than specific to a namespace, you can use a ClusterRole and an associated
ClusterRoleBinding instead.
In the context of our Airflow deployment, a ClusterRole is required to allow the relevant service account to manage Pods. Therefore,
we created an airflow-pod-operator role:
apiVersion: rbac.authorization.k8s.io/v1
kind: ClusterRole
metadata:
  namespace: airflow
  name: airflow-pod-operator
rules:
- apiGroups: [""]
  resources: ["pods"]
  verbs: ["create", "delete", "get", "list", "patch", "watch"]
with an associated role binding:
apiVersion: rbac.authorization.k8s.io/v1
kind: ClusterRoleBinding
metadata:
  name: airflow-pod-operator
subjects:
- kind: ServiceAccount
  name: airflow-service-account
  namespace: airflow
roleRef:
  kind: Role
  name: airflow-pod-operator
  apiGroup: rbac.authorization.k8s.io
Scheduler Deployment
The scheduler is a critical component of the Airflow application, and it needs to be deployed to its own Pod inside the cluster. At its core, the scheduler is responsible for ensuring DAGs run when they are supposed to, and tasks are scheduled and ordered accordingly.
The scheduler deployment manifest file that comes with the Helm chart (you can find it inside the scheduler folder) is a
good starting point for the configuration. You’ll only need to tweak it a bit to match your namespace and any specific
configuration you might have around volumes.
In our case, we wanted to sync our DAGs from a GitHub repository, so we needed to configure a git-sync container. An easy way to get started is to configure the connection with a username and token, although for a production deployment it’s best to configure the connection via SSH. With git-sync configured, our scheduler deployment looked like this:
apiVersion: apps/v1
kind: Deployment
metadata:
  name: airflow-scheduler
  namespace: airflow
  labels:
    tier: airflow
    component: scheduler
    release: airflow
spec:
  replicas: 1
  selector:
    matchLabels:
      tier: airflow
      component: scheduler
      release: airflow
  template:
    metadata:
      labels:
        tier: airflow
        component: scheduler
        release: airflow
      annotations:
        cluster-autoscaler.kubernetes.io/safe-to-evict: "true"
    spec:
      restartPolicy: Always
      terminationGracePeriodSeconds: 10
      serviceAccountName: airflow-service-account
      volumes:
        - name: config
          configMap:
            name: airflow-config
        - name: dags-volume
          emptyDir: {}
        - name: logs-volume
          persistentVolumeClaim:
            claimName: airflow-logs-pvc
      initContainers:
        - name: run-airflow-migrations
          image: apache/airflow:2.7.1-python3.11
          imagePullPolicy: IfNotPresent
          args: ["bash", "-c", "airflow db migrate"]
          env:
            - name: AIRFLOW__CORE_FERNET_KEY
              valueFrom:
                secretKeyRef:
                  name: airflow-metadata
                  key: fernet-key
            - name: AIRFLOW__CORE__SQL_ALCHEMY_CONN
              valueFrom:
                secretKeyRef:
                  name: airflow-metadata
                  key: connection
            - name: AIRFLOW_CONN_AIRFLOW_DB
              valueFrom:
                secretKeyRef:
                  name: airflow-metadata
                  key: connection
          volumeMounts:
            - name: config
              mountPath: "/opt/airflow/airflow.cfg"
              subPath: airflow.cfg
              readOnly: true
      containers:
        - name: git-sync
          image: registry.k8s.io/git-sync/git-sync:v4.0.0-rc5
          args:
            - --repo=https://github.com/ombulabs/airflow-pipelines
            - --depth=1
            - --period=60s
            - --link=current
            - --root=/git
            - --ref=main
          env:
            - name: GITSYNC_USERNAME
              valueFrom:
                secretKeyRef:
                  name: git-username
                  key: username
            - name: GITSYNC_PASSWORD
              valueFrom:
                secretKeyRef:
                  name: git-token
                  key: token
          volumeMounts:
            - name: dags-volume
              mountPath: /git

        - name: scheduler
          image: us-east1-docker.pkg.dev/my_project/airflow-images/airflow-deployment:latest
          imagePullPolicy: Always
          args:
            - scheduler
          env:
            - name: AIRFLOW__CORE__DAGS_FOLDER
              value: "/git/current"
            - name: AIRFLOW__CORE__FERNET_KEY
              valueFrom:
                secretKeyRef:
                  name: airflow-metadata
                  key: fernet-key
            - name: AIRFLOW__CORE__SQL_ALCHEMY_CONN
              valueFrom:
                secretKeyRef:
                  name: airflow-metadata
                  key: connection
            - name: AIRFLOW_CONN_AIRFLOW_DB
              valueFrom:
                secretKeyRef:
                  name: airflow-metadata
                  key: connection
          livenessProbe:
            failureThreshold: 15
            periodSeconds: 30
            exec:
              command:
                - python
                - -Wignore
                - -c
                - |
                  import os
                  os.environ['AIRFLOW__CORE__LOGGING_LEVEL'] = 'ERROR'
                  os.environ['AIRFLOW__LOGGING__LOGGING_LEVEL'] = 'ERROR'
                  from airflow.jobs.scheduler_job import SchedulerJob
                  from airflow.utils.net import get_hostname
                  import sys
                  job = SchedulerJob.most_recent_job()
                  sys.exit(0 if job.is_alive() and job.hostname == get_hostname() else 1)
          volumeMounts:
            - name: config
              mountPath: "/opt/airflow/airflow.cfg"
              subPath: airflow.cfg
              readOnly: true
            - name: dags-volume
              mountPath: /git
            - name: logs-volume
              mountPath: "/opt/airflow/logs"
The scheduler deployment is divided into two “stages”, the initContainers and the containers. When Airflow starts,
it needs to run database migrations in the metadata database. That is what the init container is doing. It runs as soon
as the scheduler pod starts, and ensures the database migration is completed before the main application containers start.
Once the init container is done with the start up task, the git-sync and scheduler containers can run.
Notice that the scheduler container references a custom image in Artifact Registry. Given our pipeline set up and choice
of executor, we replaced the official Airflow image in the deployment with our own image.
Webserver Deployment
The webserver is another critical Airflow component, it exposes the Airflow UI and manages user interaction with Airflow. Its deployment is all too similar to that of the scheduler, with minor differences, so we won’t go into it in detail. The manifest file looks like this:
apiVersion: apps/v1
kind: Deployment
metadata:
  name: airflow-webserver
  namespace: airflow
  labels:
    tier: airflow
    component: webserver
    release: airflow
spec:
  replicas: 1
  strategy:
    type: RollingUpdate
    rollingUpdate: 2023-11-17 20:54:25
      maxSurge: 3
      maxUnavailable: 1
  selector:
    matchLabels:
      tier: airflow
      component: webserver
      release: airflow
  template:
    metadata:
      labels:
        tier: airflow
        component: webserver
        release: airflow
      annotations:
        cluster-autoscaler.kubernetes.io/safe-to-evict: "true"
    spec:
      restartPolicy: Always
      terminationGracePeriodSeconds: 10
      serviceAccountName: default
      volumes:
        - name: config
          configMap:
            name: airflow-config
        - name: dags-volume
          emptyDir: {}
        - name: logs-volume
          persistentVolumeClaim:
            claimName: airflow-logs-pvc
      initContainers:
        - name: run-airflow-migrations
          image: apache/airflow:2.7.1-python3.11
          imagePullPolicy: IfNotPresent
          args: ["bash", "-c", "airflow db migrate"]
          env:
            - name: AIRFLOW__CORE__FERNET_KEY
              valueFrom:
                secretKeyRef:
                  name: airflow-metadata
                  key: fernet-key
            - name: AIRFLOW__CORE__SQL_ALCHEMY_CONN
              valueFrom:
                secretKeyRef:
                  name: airflow-metadata
                  key: connection
            - name: AIRFLOW_CONN_AIRFLOW_DB
              valueFrom:
                secretKeyRef:
                  name: airflow-metadata
                  key: connection
          volumeMounts:
            - name: config
              mountPath: "/opt/airflow/airflow.cfg"
              subPath: airflow.cfg
              readOnly: true
      containers:
        - name: git-sync
          image: registry.k8s.io/git-sync/git-sync:v4.0.0-rc5
          args:
            - --repo=https://github.com/ombulabs/airflow-pipelines
            - --depth=1
            - --period=60s
            - --link=current
            - --root=/git
            - --ref=main
          env:
            - name: GITSYNC_USERNAME
              valueFrom:
                secretKeyRef:
                  name: git-username
                  key: username
            - name: GITSYNC_PASSWORD
              valueFrom:
                secretKeyRef:
                  name: git-token
                  key: token
          volumeMounts:
            - name: dags-volume
              mountPath: /git

        - name: webserver
          image: us-east1-docker.pkg.dev/my_project/airflow-images/ombu-airflow-deployment:latest
          imagePullPolicy: Always
          args:
            - webserver
          env:
            - name: AIRFLOW__CORE__FERNET_KEY
              valueFrom:
                secretKeyRef:
                  name: airflow-metadata
                  key: fernet-key
            - name: AIRFLOW__CORE__SQL_ALCHEMY_CONN
              valueFrom:
                secretKeyRef:
                  name: airflow-metadata
                  key: connection
            - name: AIRFLOW_CONN_AIRFLOW_DB
              valueFrom:
                secretKeyRef:
                  name: airflow-metadata
                  key: connection
            - name: AIRFLOW__WEBSERVER__AUTH_BACKEND
              value: "airflow.api.auth.backend.basic_auth"
          volumeMounts:
            - name: config
              mountPath: "/opt/airflow/airflow.cfg"
              subPath: airflow.cfg
              readOnly: true
            - name: dags-volume
              mountPath: /git
            - name: logs-volume
              mountPath: "/opt/airflow/logs"
          ports:
            - name: airflow-ui
              containerPort: 8080
          livenessProbe:
            httpGet:
              path: /health
              port: 8080
            initialDelaySeconds: 30
            periodSeconds: 15
          readinessProbe:
            httpGet:
              path: /health
              port: 8080
            initialDelaySeconds: 30
            periodSeconds: 15
Perhaps the most notable thing here is the presence of the AIRFLOW__WEBSERVER__AUTH_BACKEND environment variable. This
allows us to use a basic authentication backend with Airflow. As part of this deployment, we didn’t configure the creation
of a root user, meaning one needed to be created from within the container by the first person trying to access the UI. If
you find yourself in the same situation:
Run
kubectl exec -it <webserver-pod-name> -n airflow -c webserver -- /bin/sh
to access the shell within the webserver container. By default, running the command without the -c webserver flag will
access the git-sync container, which is not what we want. Once inside the shell, run:
su airflow
To switch to the airflow user. This is needed to run airflow commands. Now you can run:
airflow users create --username <your_username> --firstname <first_name> --lastname <last_name> --role <the-user-role> --email <your-email> --password <your-password>
This will create a user with the specified role. This only needs to be run to create the first admin user after a fresh deployment, additional users can be created directly from within the interface.
Services and Ingresses
Having the webserver deployed to a pod is not enough to be able to access the UI. It needs a Service resource associated
with it to allow access to the workload running inside the cluster. From our webserver manifest file, we defined an airflow-ui
port name for the 8080 container port. Now we need a service that exposes this port so that network traffic can be directed
to the correct pod:
kind: Service
apiVersion: v1
metadata:
  name: webserver-svc
  namespace: airflow
spec:
  type: ClusterIP
  selector:
    tier: airflow
    component: webserver
    release: airflow
  ports:
    - name: airflow-ui
      protocol: TCP
      port: 80
      targetPort: 8080
There are five types of Kubernetes services
that can be defined, with the ClusterIP type being the default. It provides an internal IP and DNS name, making the service
only accessible within the cluster. This means that we now have a service associated with the webserver, but we still can’t
access the UI through a friendly subdomain as a regular application.
For that, we’ll configure an ingress next. An Ingress is an API object that defines the rules and configurations to manage
external access to our cluster’s services.
apiVersion: networking.k8s.io/v1
kind: Ingress
metadata:
  name: airflow-ingress
  namespace: airflow
  annotations:
    cert-manager.io/cluster-issuer: "letsencrypt"
spec:
  ingressClassName: "nginx"
  tls:
    - hosts:
        - airflow.my_domain.com
      secretName: cert-tls-secret
  rules:
    - host: airflow.my_domain.com
      http:
        paths:
          - path: /
            pathType: Prefix
            backend:
              service:
                name: webserver-svc
                port:
                  number: 80
The key configuration here that allows us to define the settings for secure HTTPS connections is the tls section. There,
we can list all hosts for which to enable HTTPS and the name of the Kubernetes Secret that holds the TLS certificate and
private key to use to secure the connection. This secret is automatically created by cert-manager.
Service Accounts
Finally, in order to ensure our resources have the necessary permission to spawn new pods and manage pods, we need to configure service accounts for them. You can choose to configure individual service accounts for each resource or a single service account for all resources, depending on your security requirements.
The ServiceAccount resource can be configured as:
apiVersion: v1
kind: ServiceAccount
metadata:
  name: default
  namespace: airflow
  labels:
    tier: airflow
    component: scheduler
    release: airflow
automountServiceAccountToken: true
Since we wanted users to be able to manage workflows directly from the UI, we also configured a service account for the webserver.
The StatsD Application
This is an optional component that collects metrics inside the Airflow application. The deployment is similar to the other two, so we won’t dive into it.
Conclusion
Airflow is now deployed to a GKE cluster and accessible via our chosen subdomain. This allows us to have a higher level of control over our infrastructure, while still leveraging GKE’s built-in resources to auto-scale as needed.