
Introduction
AI Agents are everywhere. Every day, tools, libraries, new use cases, and new products come out using and leveraging AI Agents. Several frameworks have been developed to make them easy to build, but what happens under the hood?
A very popular pattern for building AI Agents is the ReAct pattern, meaning Reasoning and Acting. The idea is to get large language models (LLMs) to reason about a problem in a manner analogous to how humans do, by breaking down the problem into smaller steps, reasoning about each step, using tools, and then acting on the results.
Let’s walk through the ReAct pattern and how we can use it to build a simple AI Agent that writes blog posts in Ruby.
The ReAct Pattern Explained
The ReAct pattern was first introduced by Yao et al. in their paper “ReAct: Synergizing Reasoning and Acting in Language Models” . The key idea is to combine reasoning (thinking) and acting (doing) in a way that allows LLMs to solve complex tasks more effectively.
In a standard, one step answer generation, the user submits a query, the LLM is prompted to generate an answer, and the answer is returned directly to the user.
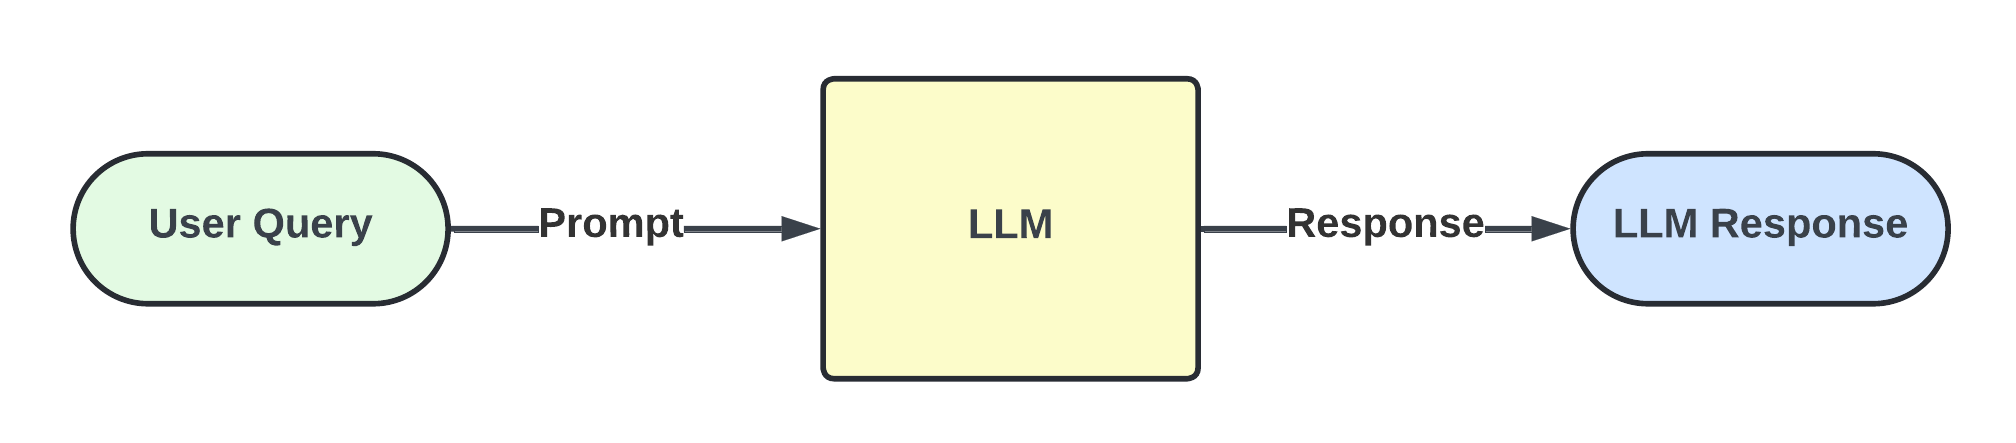
This approach works well for simple questions, but struggles as the tasks become more complex, or when external resources are needed to further inform an answer.
Techniques to tackle reasoning and acting separately exist - chain-of-thought prompting and function calling, for example - but the combination of both steps into a single loop is what makes ReAct powerful.
ReAct combines both reasoning and acting, allowing the model to reason about the results of its actions and use that reasoning to inform its next steps. This is done by breaking down the task into smaller steps, reasoning about each step, using tools to interact with external systems and perform actions, and then reasoning about the results of those actions.
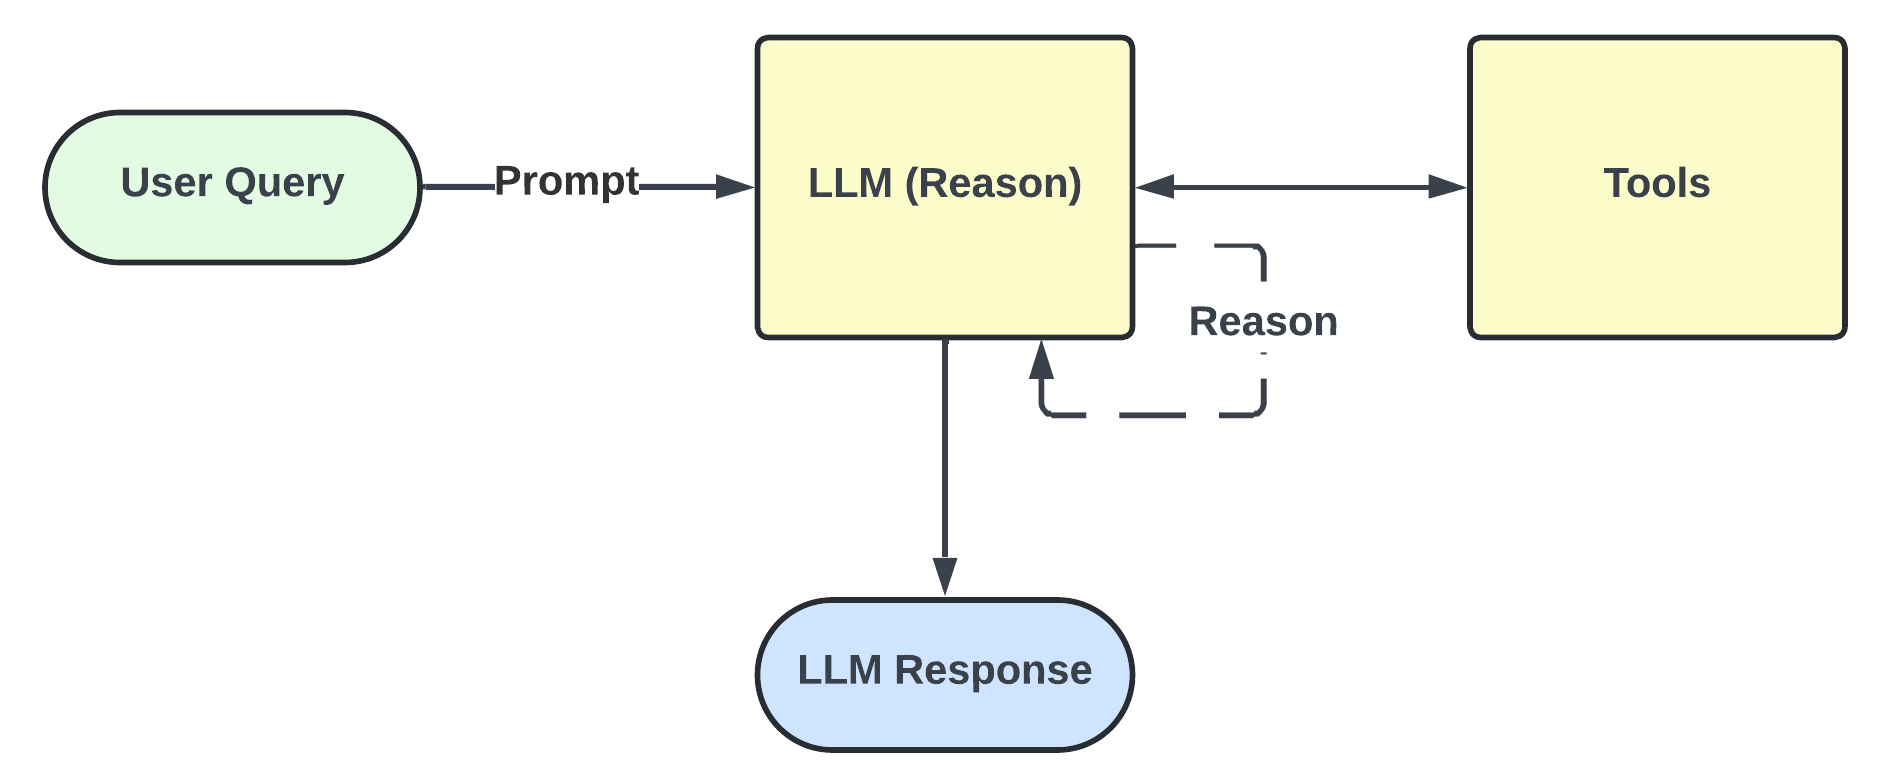
In essence, the agent operates in a loop of:
THOUGHT: Reason about the task and decide on the next action
ACTION: Call a tool or perform an action based on the reasoning
OBSERVATION: Receive the result of the action
Combining reasoning and acting allows for more complex tasks to be solved effectively.
Implementing ReAct in Ruby
To implement this, we’ll use the Anthropic Ruby SDK , Tavily for web search and Serper.dev for image search. You’ll need to set up API keys for all three of them. While Anthropic requires a 5 dollar purchase to get started, Tavily and Serper.dev have free tiers.
Setting Up
Make sure you have the required gems in your Gemfile:
source "https://rubygems.org"

gem "anthropic", "~> 1.1.1"
gem "dotenv"
gem "faraday"
You will also need all three API keys in your .env file:
ANTHROPIC_API_KEY=your_anthropic_api_key
SERPER_API_KEY=your_serper_api_key
TAVILY_API_KEY=your_tavily_api_key
Preparing the Tools
Our agent will use three tools: web search, image search, and saving content to a file. Let’s define the web search tool:
# tools.rb
require "faraday"

class Tools
  def web_search(query)
    response = tavily_client.post("/search") do |req|
      req.body = {
        query: query,
        search_depth: "advanced"
      }
    end
    parsed = JSON.parse(response.body)
    parsed["results"] || "No relevant results found."
  rescue Faraday::Error => e
    "Search failed: #{e.message}"
  end

  private

  def tavily_client
    @tavily_client ||= Faraday.new(url: "https://api.tavily.com") do |conn|
      conn.request :json
      conn.headers["Authorization"] = "Bearer #{ENV.fetch("TAVILY_API_KEY")}"
      conn.headers["Content-Type"] = "application/json"
    end
  end
end
This function uses the Tavily API to perform a web search based on the query provided, returning the results or an error message if the search fails. Next, let’s define the image search tool using Serper.dev:
# tools.rb
require "faraday"

class Tools
  def image_search(query)
    response = serper_client.post("/images") do |req|
      req.body = { q: query }
    end
    parsed = JSON.parse(response.body)
    first_image = parsed["images"][0]
    {
      title: first_image["title"],
      url: first_image["imageUrl"]
    }
  rescue Faraday::Error => e
    "Image search failed: #{e.message}"
  end

  def web_search(query)
    response = tavily_client.post("/search") do |req|
      req.body = {
        query: query,
        search_depth: "advanced"
      }
    end
    parsed = JSON.parse(response.body)
    parsed["results"] || "No relevant results found."
  rescue Faraday::Error => e
    "Search failed: #{e.message}"
  end

  private

  def serper_client
    @serper_client ||= Faraday.new(url: "https://google.serper.dev") do |conn|
      conn.request :json
      conn.headers["X-API-KEY"] = ENV.fetch("SERPER_API_KEY")
      conn.headers["Content-Type"] = "application/json"
    end
  end

  def tavily_client
    @tavily_client ||= Faraday.new(url: "https://api.tavily.com") do |conn|
      conn.request :json
      conn.headers["Authorization"] = "Bearer #{ENV.fetch("TAVILY_API_KEY")}"
      conn.headers["Content-Type"] = "application/json"
    end
  end
end
Now we have a way to search for images based on a provided query.
Finally, let’s define the tool to save content to a file:
# tools.rb
require "faraday"

class Tools
  def save_to_file(content, filename)
    if content.nil? || content.strip.length < 20
      return "Save failed: content is too short or empty."
    end

    File.open(filename, "w") do |file|
      file.write(content)
    end
    "Content saved to #{filename}"
  rescue => e
    "Failed to save content: #{e.message}"
  end

  def image_search(query)
    response = serper_client.post("/images") do |req|
      req.body = { q: query }
    end
    parsed = JSON.parse(response.body)
    first_image = parsed["images"][0]
    { title: first_image["title"], url: first_image["imageUrl"] }
  rescue Faraday::Error => e
    "Image search failed: #{e.message}"
  end

  def web_search(query)
    response = tavily_client.post("/search") do |req|
      req.body = {
        query: query,
        search_depth: "advanced"
      }
    end
    parsed = JSON.parse(response.body)
    parsed["results"] || "No relevant results found."
  rescue Faraday::Error => e
    "Search failed: #{e.message}"
  end

  private

  def serper_client
    @serper_client ||= Faraday.new(url: "https://google.serper.dev") do |conn|
      conn.request :json
      conn.headers["X-API-KEY"] = ENV.fetch("SERPER_API_KEY")
      conn.headers["Content-Type"] = "application/json"
    end
  end

  def tavily_client
    @tavily_client ||= Faraday.new(url: "https://api.tavily.com") do |conn|
      conn.request :json
      conn.headers["Authorization"] = "Bearer #{ENV.fetch("TAVILY_API_KEY")}"
      conn.headers["Content-Type"] = "application/json"
    end
  end
end
And now we have all of our tools defined. The last step in setting up our tools for the agent to use is to create function definitions for them. In order to decide which tool to use, we’ll leverage function calling, which allows the LLM to interact with tools. You can read more about it in the Anthropic Tool use with Claude documentation .
Anthropic expects the function definitions to be in a specific JSON format, so Claude can understand which tools are available and what each tools does:
{
  "name": "",
  "description": "",
  "input_schema": {
    "type": "object",
    "properties": {},
    "required": []
  }
}
Here’s how we can define our tools:
FUNCTION_DEFINITIONS = [
  {
    name: "web_search",
    description: "Search the web for a topic",
    input_schema: {
      type: "object",
      properties: {
        query: { type: "string", description: "The topic to search for" }
      },
      required: ["query"]
    }
  },
  {
    name: "image_search",
    description: "Find an image related to the topic",
    input_schema: {
      type: "object",
      properties: {
        query: { type: "string", description: "The image search term" }
      },
      required: ["query"]
    }
  },
  {
    name: "save_to_file",
    description: "Save the markdown blog post to a file",
    input_schema: {
      type: "object",
      properties: {
        content: { type: "string", description: "Markdown content of the blog post" },
        filename: { type: "string", description: "Markdown file name to save as (e.g., 'my-post.md')" }
      },
      required: %w[content filename]
    }
  }
]
Now our tool set up is ready. We can use these definitions to call the tools from our agent.
Building the Agent
Now that we have our tools defined, we can build the agent that will use them to write a blog post.
The agent will be triggered by an incoming query, which will be the topic of the blog post. We want to define a system prompt to guide the agent’s behavior. The system prompt will instruct the agent to reason about the topic, search for relevant information, find an image, and then write a markdown blog post.
SYSTEM_PROMPT = <<~PROMPT
You are an agent that thinks step by step and uses tools to complete your task.
Your task is to write a blog post on the given topic.
The blog post must:
- Start with a markdown H1 title (e.g. `# Hammer Head Sharks`)
- Include a markdown image below the title (``)
- Include a few paragraphs of well-formatted markdown content
Available tools:
- web_search: to look up information on the topic and gather relevant content
- image_search: to find an image related to the topic
- save_to_file: to save the final blog post to a file
You should:
1. Use `web_search` to gather information about the topic (iterate until you have enough content)
2. Use `image_search` to find a relevant image
3. Format the content into a markdown blog post, with:
- An H1 title
- An image below the title, added as an HTML <img> tag with the height set to no more than 300
- A few paragraphs of content
4. Save the final post using `save_to_file`
IMPORTANT: ️Do not call `save_to_file` until:
- You have included both an image and a title
- The content is complete
- You are fully ready to save
After saving, you may return a final message to the user confirming the post was saved.
PROMPT
Our prompt is structured to provide the agent with information on the task to accomplish, the requirements for the result, the available tools, and what it should do.
Now let’s build our ReAct agent. First, we’ll create a class to encapsulate the agent and initialize the Anthropic client:
# agent.rb
require "dotenv/load"
require "anthropic"

require_relative "tools"  # Assuming the Tools class is defined in tools.rb

class ReActAgent
  def initialize
    @tools = Tools.new
    @messages = []
  end

  private

  def complete
    client.messages.create(
      model: "claude-sonnet-4-20250514",
      max_tokens: 1024,
      temperature: 0.0,
      system: SYSTEM_PROMPT,
      messages: @messages,
      tools: FUNCTION_DEFINITIONS
    )
  end

  def client
    @client ||= Anthropic::Client.new(api_key: ENV.fetch("ANTHROPIC_API_KEY"))
  end
end
The @messages array will hold the conversation history, which we will use to keep track of the agent’s reasoning and actions.
In the complete, we also specify which model to use, temperature, the system prompt and the tools available to the agent.
In this example, the temperature is set to 0 so the model will be as deterministic as possible, meaning it will try to always return the same output for the same input. This keeps our test runs consistent.
A higher temperature would encourage the model to be more “creative”, so you might want to experiment with that and see what works best for your use case.
Let’s also define a method to call the right tool when the agent decides to use one:
def tool_call(tool_name, params)
  case tool_name
  when "web_search"
    @tools.web_search(params[:query])
  when "image_search"
    @tools.image_search(params[:query])
  when "save_to_file"
    @tools.save_to_file(params[:content], params[:filename] || filename)
  else
    "Unknown tool"
  end
end
Now let’s define our run method, which will be responsible for processing the user’s query and generating the blog post.
First, we need to add the user’s query to the conversation history:
def run(query)
  @messages << {
    role: "user",
    content: [
      { type: "text", text: "Write a markdown blog post on: #{query}" }
    ]
  }
end
Then we’ll start the agent loop. A ReAct agent will:
- Generate a response from the LLM
- Check if the response contains a tool call
- If it does, call the tool and add the result to the conversation history
- Repeat until the agent has completed the task
Anthropic returns responses as an array of messages. Once we get a response that contains only text and no tool calls, we’ll break the loop.
def run(query)
  @messages << {
    role: "user",
    content: [
      { type: "text", text: "Write a markdown blog post on: #{query}" }
    ]
  }

  loop do
    # Prompt the model to generate a response based on the conversation history
    response = complete

    # Check if the response contains only text blocks. If so, we can assume the agent has finished its task.
    if response.content.all? { |block| block[:type] == :text }
      puts "\n✅ Claude has finished. Exiting."
      break
    end

    # The "thought" in the reason step is the text block in the response. We'll add it to the conversation history.
    puts "\n💬 Thought: #{response.content[0][:text]}"

    @messages << {
      role: "assistant",
      content: response.content
    }

    response.content.each do |block|
      # Process tool calls in the response block
      next unless block[:type] == :tool_use

      tool_name = block[:name]
      params = block[:input]

      # The "action" in the act step is the tool call with the necessary parameters.
      # Claude provides values for the parameters, so we can call the tool directly.
      puts "🔧 Action: #{tool_name}(#{params})"

      result = tool_call(tool_name, params)

      # The result of the tool call is the observation that the agent can use to reason about the next steps.
      # We'll add the result to the conversation history.
      puts "📝 Observation: #{result.to_s[0..120]}..."

      @messages << {
        role: "user",
        content: [
          {
            type: "tool_result",
            tool_use_id: block[:id],
            content: result.to_s
          }
        ]
      }
    end
  end
end
Putting it all together, our ReActAgent class looks like this:
# agent.rb
require "dotenv/load"
require "anthropic"

require_relative "tools"

class ReActAgent
  def initialize
    @tools = Tools.new
    @messages = []
  end

  def run(query)
    @messages << {
      role: "user",
      content: [
        { type: "text", text: "Write a markdown blog post on: #{query}" }
      ]
    }

    loop do
      response = complete

      if response.content.all? { |block| block[:type] == :text }
        puts "\n✅ Claude has finished. Exiting."
        break
      end

      puts "\n💬 Thought: #{response.content[0][:text]}"

      @messages << {
        role: "assistant",
        content: response.content
      }

      response.content.each do |block|
        next unless block[:type] == :tool_use

        tool_name = block[:name]
        params = block[:input]

        puts "🔧 Action: #{tool_name}(#{params})"

        result = tool_call(tool_name, params)

        puts "📝 Observation: #{result.to_s[0..120]}..."

        @messages << {
          role: "user",
          content: [
            {
              type: "tool_result",
              tool_use_id: block[:id],
              content: result.to_s
            }
          ]
        }
      end
    end
  end

  private

  def tool_call(tool_name, params)
    case tool_name
    when "web_search"
      @tools.web_search(params[:query])
    when "image_search"
      @tools.image_search(params[:query])
    when "save_to_file"
      @tools.save_to_file(params[:content], params[:filename] || filename)
    else
      "Unknown tool"
    end
  end

  def complete
    client.messages.create(
      model: "claude-sonnet-4-20250514",
      max_tokens: 1024,
      temperature: 0.0,
      system: SYSTEM_PROMPT,
      messages: @messages,
      tools: FUNCTION_DEFINITIONS
    )
  end

  def client
    @client ||= Anthropic::Client.new(api_key: ENV.fetch("ANTHROPIC_API_KEY"))
  end
end
Testing the Agent
To test our agent, we can create a simple script that initializes the agent and runs it with a query:
# blog_writer.rb
require_relative "agent"  # Assuming the ReActAgent class is defined in agent.rb

if __FILE__ == $0
  query = ARGV[0]
  agent = ReActAgent.new
  agent.run(query)
end
Let’s see what it has to say about hammerhead sharks:
ruby blog_writer.rb "Hammer head sharks"
As the agent works through the task, we can see it’s reasoning step by step:
💬 Thought: I'll help you write a blog post about hammerhead sharks. Let me start by gathering information about them and finding a relevant image.
🔧 Action: web_search({query: "hammerhead sharks facts characteristics behavior habitat"})
📝 Observation: [{"url" => "https://whi.swimtopia.com/fun-facts-about-hammerhead-sharks", "title" => "Fun Facts About Hammerhead Sharks!"...
💬 Thought: Now let me search for more specific information about hammerhead sharks to get a comprehensive understanding.
🔧 Action: web_search({query: "hammerhead shark species types great scalloped smooth bonnethead"})
📝 Observation: [{"url" => "https://en.wikipedia.org/wiki/Hammerhead_shark", "title" => "Hammerhead shark - Wikipedia", "content" => "| S...
💬 Thought: Now let me find a relevant image for the blog post.
🔧 Action: image_search({query: "hammerhead shark underwater swimming"})
📝 Observation: {title: "Do sharks hold their breath underwater? This species might ...", url: "https://i.natgeofe.com/n/22b41661-0a35-49...
💬 Thought: Perfect! Now I have enough information to write a comprehensive blog post about hammerhead sharks. Let me create the markdown content and save it to a file.
🔧 Action: save_to_file({filename: "hammerhead-sharks.md"})
📝 Observation: Save failed: content is too short or empty....
💬 Thought: Let me create the complete blog post content first:
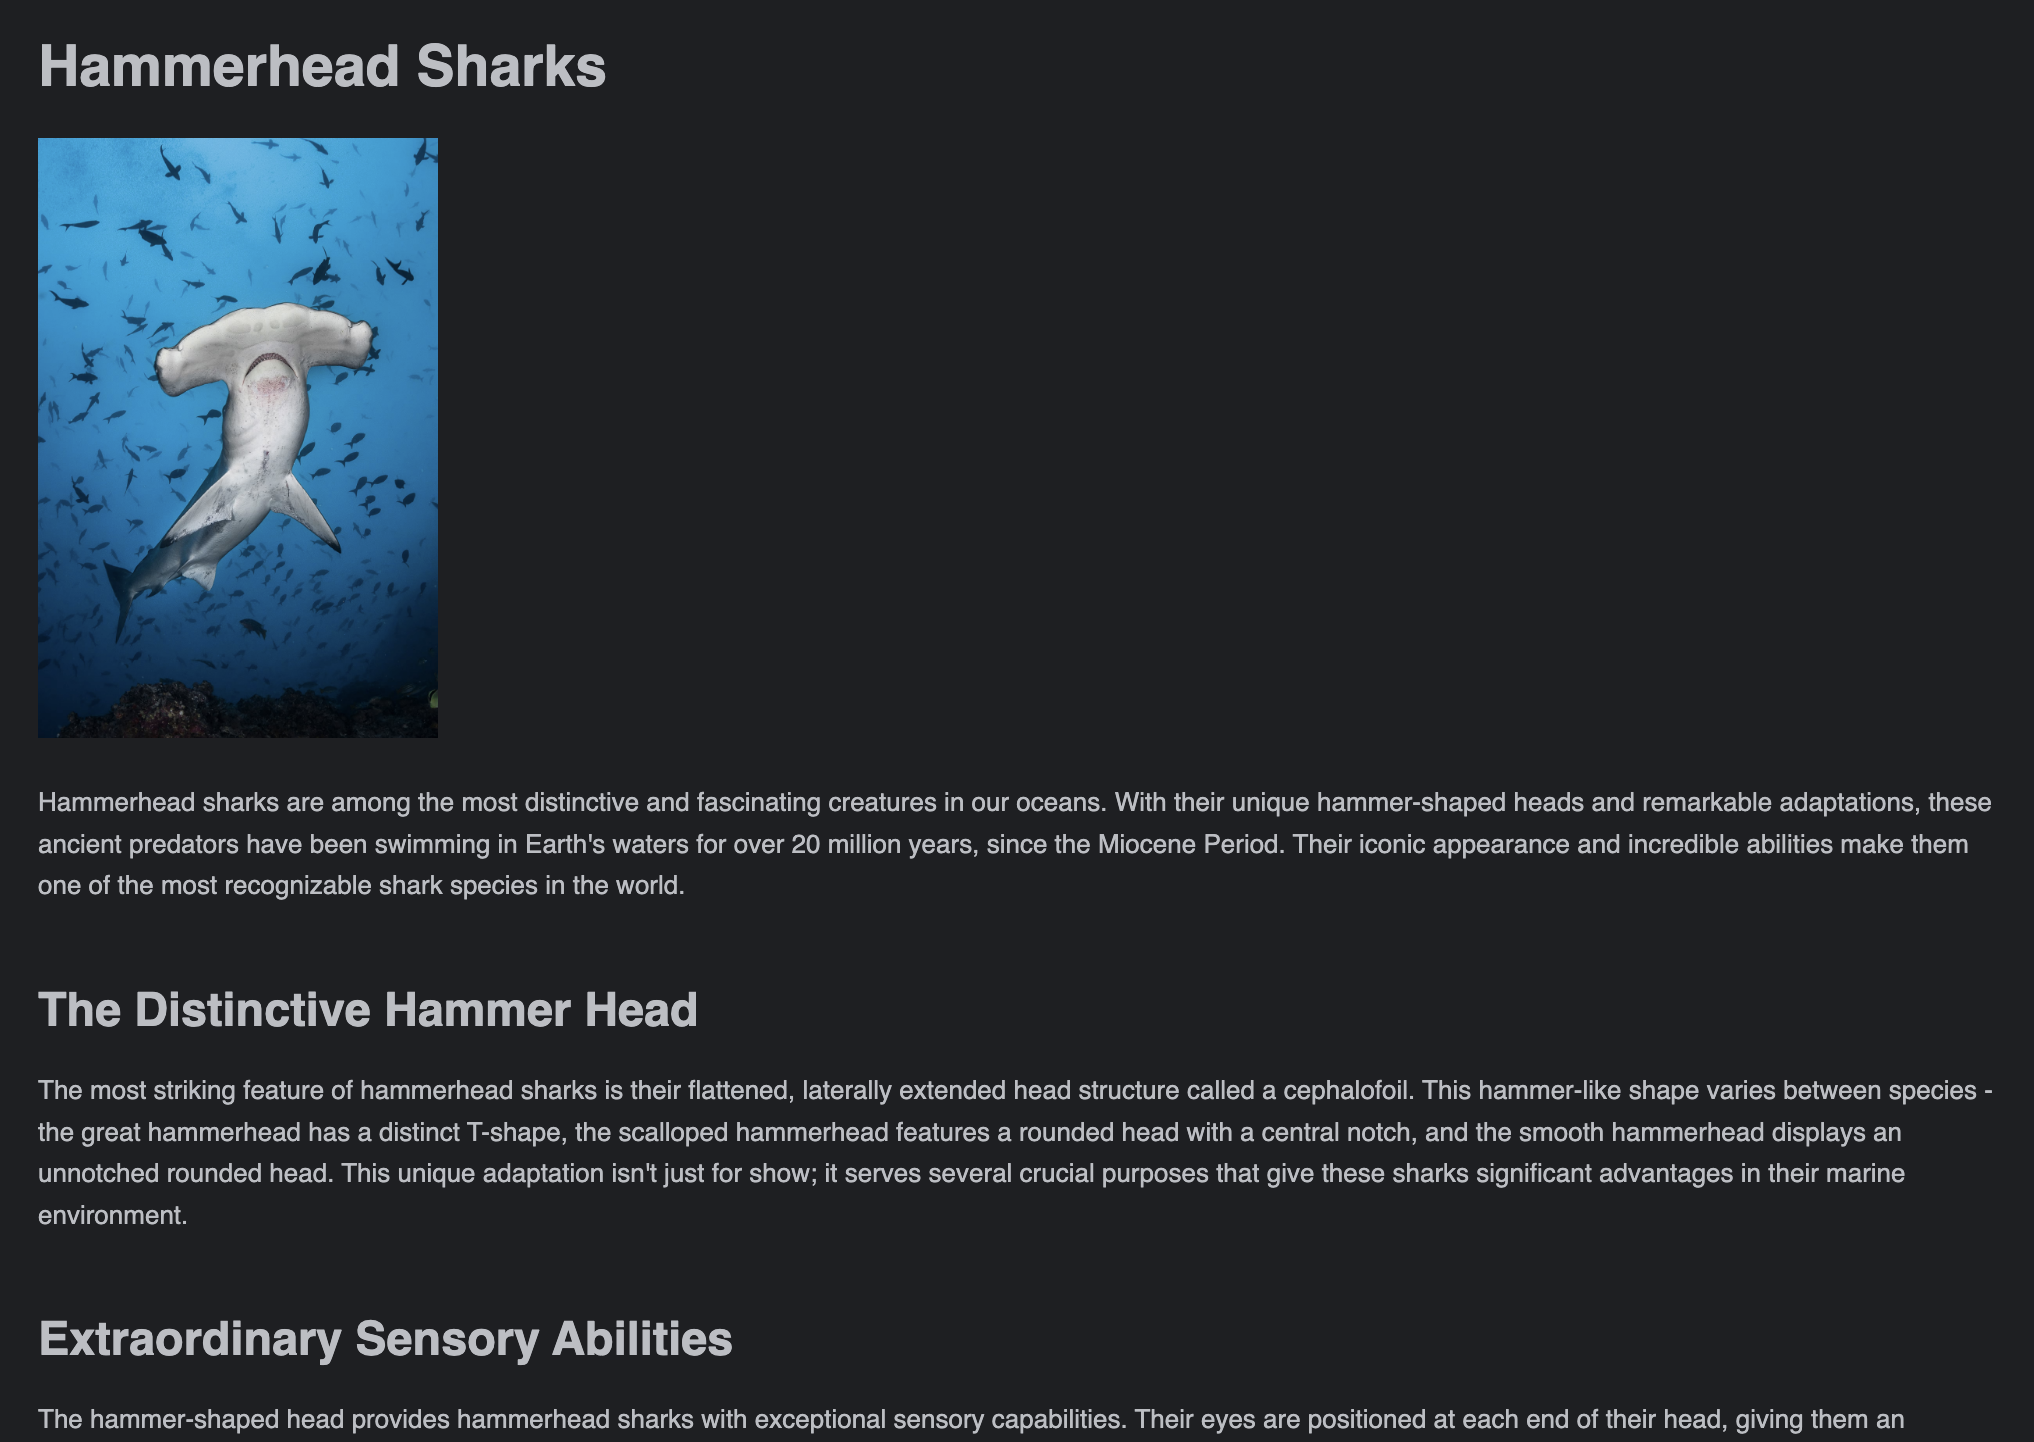
🔧 Action: save_to_file({filename: "hammerhead-sharks.md", content: "# Hammerhead Sharks\n\n<img src=\"https://i.natgeofe.com/n/22b41661-0a35-4933-8e8f-d53552a68705/National..."})
📝 Observation: Content saved to hammerhead-sharks.md...
✅ Claude has finished. Exiting.
You can see the agent reasoning about the task, searching for information, and acting on the result. You can also see, at the last step, the agent attempting to use a tool and failing (it did not provide the content of the blog post to save the file), and because it processes the result of a tool call, it understands it failed and tries again, then obtaining a successful result.
The generated post was saved in a file called hammerhead-sharks.md in the root directory, and you can see what the resulting blog post looks like below:
Conclusion
AI Agents are powerful tools, and the ReAct pattern allows us to build agents that can reason about complex tasks and interact with external tools to accomplish them. By combining reasoning and acting, we can create agents that can solve tasks in a way that is similar to how humans do, breaking down problems into smaller steps and using tools to interact with the world.
Want to know how we can help you leverage AI for your business? Talk to us today! .